
Iceberg Lakehouse on Docker Using Spark, MinIO, PyIceberg, Jupyter Notebooks, and REST Catalog
A step-by-step guide to building a local data lakehouse environment with Apache Iceberg and modern data tools using Docker.

Setting up a data lakehouse environment in the cloud can be daunting and expensive for developers who are just getting started. Cloud resources like object storage, compute clusters, and metadata services can quickly add up in costs while you're still learning and experimenting with features. Moreover, the complexity of configuring multiple services to work together can be overwhelming for newcomers.
This tutorial aims to solve these challenges by providing a completely local development environment using Docker. You'll be able to explore Apache Iceberg's features and experiment with different configurations without worrying about cloud costs or complex setups. The environment includes everything you need: Spark for processing, MinIO for storage, and a REST catalog for metadata management.
This guide is particularly useful for:
Data engineers and architects evaluating Iceberg for their organizations
Developers who want to learn Iceberg's features through hands-on practice
Teams looking to set up a local development environment for Iceberg-based projects
Anyone interested in understanding how different components of a data lakehouse work together
In this tutorial, we'll follow the Spark Iceberg Quickstart Guide while taking a detailed look at preparing the data lakehouse infrastructure. Once the infrastructure is ready, we'll perform several end-to-end DDL operations on Iceberg tables, including:
Creating an Iceberg database
Creating an Iceberg table and inserting records with SQL
Querying the Iceberg table with PyIceberg
Examining the Iceberg catalog with PyIceberg CLI
Let’s dive in!
Before you begin
The folks at Tabular (now part of Databricks) have done a wonderful job by creating a Docker image that includes Python 3, Spark with Iceberg support, Jupyter Notebooks, and PyIceberg. This image works seamlessly with the Tabular Iceberg REST catalog for metadata management, while MinIO serves as our storage backend for both data and metadata.
Let's start by cloning the Git repository containing this image to your local machine.
git clone https://github.com/databricks/docker-spark-iceberg.git
cd docker-spark-iceberg
We will deploy everything on Docker Compose. So make sure you have installed Docker and Docker Compose on your machine.
Breakdown of the docker-compose file
The docker-compose.yml file located in the root level of the repo defines a set of services that work together to create the data lakehouse environment.
version: "3"

services:
  spark-iceberg:
    image: tabulario/spark-iceberg
    container_name: spark-iceberg
    build: spark/
    networks:
      iceberg_net:
    depends_on:
      - rest
      - minio
    volumes:
      - ./warehouse:/home/iceberg/warehouse
      - ./notebooks:/home/iceberg/notebooks/notebooks
    environment:
      - AWS_ACCESS_KEY_ID=admin
      - AWS_SECRET_ACCESS_KEY=password
      - AWS_REGION=us-east-1
    ports:
      - 8888:8888
      - 8080:8080
      - 10000:10000
      - 10001:10001
  rest:
    image: apache/iceberg-rest-fixture
    container_name: iceberg-rest
    networks:
      iceberg_net:
    ports:
      - 8181:8181
    environment:
      - AWS_ACCESS_KEY_ID=admin
      - AWS_SECRET_ACCESS_KEY=password
      - AWS_REGION=us-east-1
      - CATALOG_WAREHOUSE=s3://warehouse/
      - CATALOG_IO__IMPL=org.apache.iceberg.aws.s3.S3FileIO
      - CATALOG_S3_ENDPOINT=http://minio:9000
  minio:
    image: minio/minio
    container_name: minio
    environment:
      - MINIO_ROOT_USER=admin
      - MINIO_ROOT_PASSWORD=password
      - MINIO_DOMAIN=minio
    networks:
      iceberg_net:
        aliases:
          - warehouse.minio
    ports:
      - 9001:9001
      - 9000:9000
    command: ["server", "/data", "--console-address", ":9001"]
  mc:
    depends_on:
      - minio
    image: minio/mc
    container_name: mc
    networks:
      iceberg_net:
    environment:
      - AWS_ACCESS_KEY_ID=admin
      - AWS_SECRET_ACCESS_KEY=password
      - AWS_REGION=us-east-1
    entrypoint: |
      /bin/sh -c "
      until (/usr/bin/mc config host add minio http://minio:9000 admin password) do echo '...waiting...' && sleep 1; done;
      /usr/bin/mc rm -r --force minio/warehouse;
      /usr/bin/mc mb minio/warehouse;
      /usr/bin/mc policy set public minio/warehouse;
      tail -f /dev/null
      "
networks:
  iceberg_net:
Let’s break down each service and its purpose:
spark-iceberg- This container spins up a Spark cluster preconfigured with Iceberg runtime support. In addition to that, this brings in a Jupyter Notebooks server and the PyIceberg SDK and CLIrest- Deploys the Iceberg REST catalog implementation that uses MinIO as its storage backendminio- Deploys the MinIO storage servermc- MinIO Client providing a CLI
If you already have Spark installed, you can add Iceberg support in two ways: use the --packages option when starting a Spark/PySpark shell, or add the iceberg-spark-runtime-<version> to Spark's jars folder. The spark-iceberg service has already performed this for you to save time.
Deconstructing the spark-iceberg Dockerfile
This ./spark folder holds the necessary files for building the spark-iceberg image.
The ./spark/Dockerfile contains all the instructions for preparing a Spark runtime with Iceberg support. In addition to that, it assembles essential tools for a better Iceberg developer experience—to make working with Iceberg easier. Let's highlight only the configurations that are relevant to us.
First, we start building a new image based on the Python 3.10 base image. After that, essential Unix system utilities are installed along with openjdk-11-jdk which provides the Java runtime for Spark.
FROM python:3.10-bullseye

RUN apt-get update && \
    apt-get install -y --no-install-recommends \
      sudo \
      curl \
      vim \
      unzip \
      openjdk-11-jdk \
      build-essential \
      software-properties-common \
      ssh && \
    apt-get clean && \
    rm -rf /var/lib/apt/lists/*
The requirements.txt file in the same folder lists the Python dependencies that we are going to need. This includes the Jupyter Notebooks server, PyIceberg libraries, etc.
jupyter==1.0.0
spylon-kernel==0.4.1
pyiceberg[pyarrow,duckdb,pandas]==0.7.1
jupysql==0.10.5
matplotlib==3.9.2
scipy==1.14.1
duckdb-engine==0.13.1
They are installed with pip
COPY requirements.txt .
RUN pip3 install -r requirements.txt
Next, we define several environment variables and download the Apache Spark distribution. Notice the Spark and Iceberg versions we use here.
# Optional env variables
ENV SPARK_HOME=${SPARK_HOME:-"/opt/spark"}
ENV PYTHONPATH=$SPARK_HOME/python:$SPARK_HOME/python/lib/py4j-0.10.9.7-src.zip:$PYTHONPATH

WORKDIR ${SPARK_HOME}

ENV SPARK_VERSION=3.5.2
ENV SPARK_MAJOR_VERSION=3.5
ENV ICEBERG_VERSION=1.6.0

# Download spark
RUN mkdir -p ${SPARK_HOME} \
 && curl https://dlcdn.apache.org/spark/spark-${SPARK_VERSION}/spark-${SPARK_VERSION}-bin-hadoop3.tgz -o spark-${SPARK_VERSION}-bin-hadoop3.tgz \
 && tar xvzf spark-${SPARK_VERSION}-bin-hadoop3.tgz --directory /opt/spark --strip-components 1 \
 && rm -rf spark-${SPARK_VERSION}-bin-hadoop3.tgz
Once the Spark distribution is downloaded and extracted, we continue to download the Iceberg runtime for Spark.
# Download iceberg spark runtime
RUN curl https://repo1.maven.org/maven2/org/apache/iceberg/iceberg-spark-runtime-${SPARK_MAJOR_VERSION}_2.12/${ICEBERG_VERSION}/iceberg-spark-runtime-${SPARK_MAJOR_VERSION}_2.12-${ICEBERG_VERSION}.jar -Lo /opt/spark/jars/iceberg-spark-runtime-${SPARK_MAJOR_VERSION}_2.12-${ICEBERG_VERSION}.jar
Notice how the Iceberg jars are placed inside the jars folder of the Spark installation, which is located in the/opt/spark folder of the image.
Next, we create the notebook command that enables the container to start a Jupyter Notebook server configured for PySpark by simply running it.
# Add a notebook command
RUN echo '#! /bin/sh' >> /bin/notebook \
 && echo 'export PYSPARK_DRIVER_PYTHON=jupyter-notebook' >> /bin/notebook \
 && echo "export PYSPARK_DRIVER_PYTHON_OPTS=\"--notebook-dir=/home/iceberg/notebooks --ip='*' --NotebookApp.token='' --NotebookApp.password='' --port=8888 --no-browser --allow-root\"" >> /bin/notebook \
 && echo "pyspark" >> /bin/notebook \
 && chmod u+x /bin/notebook
You will also find the spark-defaults.conf located in the same folder. The following line copies it to Spark’s configuration folder.
COPY spark-defaults.conf /opt/spark/confThe spark-defaults.conf file is a configuration file used in Apache Spark to set default configuration parameters for Spark applications. It allows you to define system-wide default settings that will be applied to all Spark jobs running on a cluster, such as memory allocations, logging levels, performance tuning parameters, and other runtime configurations.
In the spark-defaults.conf file, you will notice several configurations instructing Spark to set up a REST-based Iceberg catalog (demo) using MinIO as the object storage backend.
spark.sql.catalog.demo                 org.apache.iceberg.spark.SparkCatalog
spark.sql.catalog.demo.type            rest
spark.sql.catalog.demo.uri             http://rest:8181
spark.sql.catalog.demo.io-impl         org.apache.iceberg.aws.s3.S3FileIO
spark.sql.catalog.demo.warehouse       s3://warehouse/wh/
spark.sql.catalog.demo.s3.endpoint     http://minio:9000
If you look closely, you will see that the spark.sql.catalog.demo.uri points to http://rest:8181, which is the REST catalog's endpoint deployed in the rest container, enabling Spark to communicate with the catalog for metadata operations.
spark.sql.catalog.demo.s3.endpoint points to the MinIO server container allowing Iceberg to use MinIO as the storage backend for the catalog while spark.sql.catalog.demo.warehouse defines the root directory where table data and metadata are stored in MinIO. Lastly, spark.sql.catalog.demo.io-impl configures Iceberg to use the S3FileIO implementation, enabling it to read from and write to S3-compatible object storage like MinIO.
Finally, we copy the .pyiceberg.yaml file to the root directory of the container. This file configures the PyIceberg runtime to work with the Iceberg REST catalog. We will discuss the contents of the file in detail later.
COPY .pyiceberg.yaml /root/.pyiceberg.yamlWell, that’s it. While this Dockerfile is a long one, it simplified many things for you that you’d have to do manually otherwise. Next, let’s start everything up.
Running everything
In the same directory as the docker-compose.yml file, run the following command to start all the containers.
docker-compose up -dThe runtime provided by the docker-compose file is far from a large-scale production-grade warehouse, but it does let you explore Iceberg’s wide range of features. Let’s quickly cover this minimal runtime.
Spark 3.5.2 in local mode (the Engine)
MinIO as the object store (the Lake)
An Iceberg REST catalog backed by MinIO (the Catalog)
A
%%sqlmagic command to easily run SQL in a notebook cell
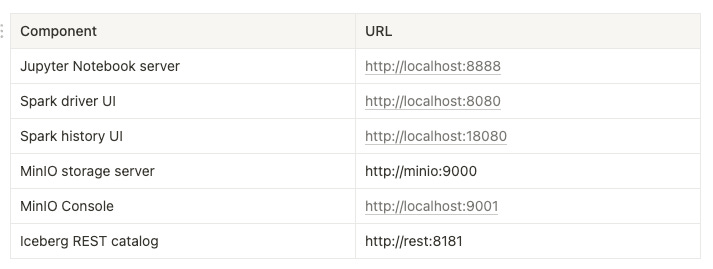
The following table lists these components with the URLs they expose.
The runtime representation of the lakehouse architecture would look like this:

It will take some time to get all the services for the first time. Once all the services are up and running, head over to localhost:9001 to log in to the MinIO console with the username “admin” and the password “password”.

These credentials come from the environment variables defined in the docker-compose.yml file.
minio:
    image: minio/minio
    container_name: minio
    environment:
      - MINIO_ROOT_USER=admin
      - MINIO_ROOT_PASSWORD=password
Feel free to change them as you want.
Once you log in to the console, click on the “buckets” section from the menu on the left, and you will notice a bucket named “warehouse”. Minio is an S3-compatible storage layer, so a bucket is essentially where you can save files in object storage solutions like S3 and Minio.

If you're wondering how this bucket was created automatically, it happens through the entrypoint command defined under mc, the MinIO Client, in the docker-compose.yaml file.
entrypoint: >
      /bin/sh -c "
      until (/usr/bin/mc config host add minio http://minio:9000 admin password) do echo '...waiting...' && sleep 1; done;
      /usr/bin/mc rm -r --force minio/warehouse;
      /usr/bin/mc mb minio/warehouse;
      /usr/bin/mc policy set public minio/warehouse;
      tail -f /dev/null
This command removes any existing content in the minio/warehouse bucket using the mc rm -r --force minio/warehouse command. This ensures that the bucket is empty before any new operations are performed. Next, it creates a new bucket named warehouse in the MinIO server using the mc mb minio/warehouse command. After creating the bucket, it sets the bucket's policy to public, making the contents of the bucket accessible to the public.
Creating a database and an Iceberg table
Now that our development environment is up and running with all the necessary components, we can start creating and working with Iceberg tables. Let's create a database and sample tables to explore Iceberg's features.
The first step is to access your development environment. In a browser, navigate to localhost:8888/lab to access the Jupyter Notebook server exposed by the spark-iceberg container.
You should see something like this:

Go ahead and create a new Python 3 notebook as shown above.
While you can use the terminal to write code in the PySpark environment, we prefer Jupyter Notebooks because they offer an interactive workspace where you can write and test code immediately, while also allowing you to document your work with explanatory text and visualizations. The ability to organize code into separate cells, maintain a persistent record of your work, and easily create visual representations of your data makes notebooks particularly valuable for data analysis tasks.
Let’s create a new database and a simple table that has one partition. Insert the following code in a new cell to create a new database named accounts.
%%sql
CREATE DATABASE IF NOT EXISTS accounts;
You will notice that %%sql in the first line, which is a Jupyter Notebook magic command that allows us to write SQL queries directly in a notebook cell. When we use this magic command, the cell's contents are interpreted as SQL rather than Python code. This is particularly useful when working with Spark SQL as it saves us from having to wrap our SQL queries in Python strings and calling Spark SQL functions explicitly. This magic command comes from JupySQL, which we installed via the requirements.txt file while building the spark-iceberg image.
jupysql==0.10.5
duckdb-engine==0.13.1
Next, place the following code block to create the users table with one partition.
%%sql
CREATE TABLE IF NOT EXISTS accounts.users (
    id INT,
    first_name VARCHAR(25),
    last_name VARCHAR(25),
    email VARCHAR(50)
)
USING iceberg
PARTITIONED BY (truncate(1, last_name))
The truncate(1, last_name) in the PARTITIONED BY clause demonstrates Iceberg's powerful Hidden Partitioning feature. This feature enables advanced partitioning strategies without creating extra columns that make querying the table more complicated. In this case, we're using a partition transform to group records based on the first character of each person's last_name.
Let's examine what happens in MinIO before adding any records. After creating the table, Iceberg generates a metadata file—the first level in its data architecture. To view this, log in to the MinIO Console at localhost:9001. As defined in the Docker Compose file, all data is stored in the warehouse bucket. Inside this bucket, you'll find the metadata file for the users table. Notice how the REST Catalog uses both the database and table names in the file path.

This is the only metadata file that exists in MinIO at this point since we have not added any data to the table.
While experimenting with Apache Iceberg, you may want to drop a table to start over. You can use the DROP TABLE clause to drop the users table if you need to modify its configuration.
Adding records to the table
Run the code below in a new notebook cell to add 10 records to the users table:
%%sql
INSERT INTO accounts.users (id, first_name, last_name, email) VALUES
(1, 'Juli', 'Arthars', 'jarthars0@mit.edu'),
(2, 'Matthiew', 'Hurley', 'mhurley1@narod.ru'),
(3, 'Lena', 'Westcarr', 'lwestcarr2@jimdo.com'),
(4, 'Reagen', 'Josifovitz', 'rjosifovitz3@hexun.com'),
(5, 'Ogden', 'Janecek', 'ojanecek4@yellowbook.com'),
(6, 'Calypso', 'McMurrugh', 'cmcmurrugh5@cam.ac.uk'),
(7, 'Dru', 'Garces', 'dgarces6@privacy.gov.au'),
(8, 'Jack', 'Matschoss', 'jmatschoss7@latimes.com'),
(9, 'Patty', 'Furnell', 'pfurnell8@yelp.com'),
(10, 'Lyndsie', 'Speeks', 'lspeeks9@skyrock.com');
After running this query, go back to MinIO and check the /warehouse/accounts/users/data/ directory. You'll find folders containing the partitioned files, each labeled according to its partition value.

Querying the table with PyIceberg
While you can read all the data back from the users table with a simple SELECT query like this:
%%sql
SELECT * FROM accounts.users;
Let's try a more interesting approach using PyIceberg as it provides a pure Pythonic interface to interact with Iceberg tables, without requiring a Spark context or any JVM dependencies.
If you recall the requirements.txt file, PyIceberg was preinstalled with pyiceberg[pyarrow,duckdb,pandas]==0.7.1 during the creation of the spark-iceberg image.
Run the below code in a new notebook cell. It will return all rows from the users table.
from pyiceberg.catalog import load_catalog

# Load the REST catalog
catalog = load_catalog('default')

# Load the users table
tbl = catalog.load_table('accounts.users')

# Create a scan with filter on last_name
sc = tbl.scan(row_filter="last_name LIKE 'M%' ")

# Convert the scan results into a Pandas dataframe
df = sc.to_arrow().to_pandas()
df
This will return only the rows where the last name starts with 'M', which includes users like McMurrugh and Matschoss.

This query takes advantage of the partition we created since we are filtering by the last_name field.
Let's break down what the above code does. First, we import the pyiceberg module, followed by creating a connection to the REST catalog using load_catalog('default')
Earlier, when creating the spark-iceberg image, we copied the .pyiceberg.yaml file to the root folder of the container. That file defined the default catalog with the following configuration.
catalog:
    default:
        uri: http://rest:8181
        s3.endpoint: http://minio:9000
        s3.access-key-id: admin
        s3.secret-access-key: password
This configuration enables PyIceberg to communicate with both the REST catalog service for metadata management and MinIO for actual data storage.
Once the catalog is loaded, then we load our users table from the accounts database using catalog.load_table('accounts.users'). Finally, we convert the scan results into an Apache Arrow table and then into a Pandas DataFrame for easy data manipulation and analysis.
Working with PyIceberg CLI
Now, let's explore another powerful tool in the Iceberg ecosystem - the PyIceberg CLI. This command-line interface provides a convenient way to inspect and manage Iceberg tables directly from your terminal. It's particularly useful for quick table inspections, schema validations, and metadata analysis without writing any code. The CLI is automatically installed when you install PyIceberg, making it readily available for administrative tasks and troubleshooting.
To list the databases available in the default catalog, run the following command in a terminal from where you launched Docker Compose. The CLI uses the .pyiceberg.yaml file in the root folder to locate catalog definitions.
> docker exec -it spark-iceberg pyiceberg list
accounts
To list the tables under a database:
> docker exec -it spark-iceberg pyiceberg list accounts
accounts.users
Finally, the following describes the users table.
> docker exec -it spark-iceberg pyiceberg describe --entity=table accounts.users

Table format version  2
Metadata location     s3://warehouse/accounts/users/metadata/00001-78f6e409-71c9-4daa-a13d-16e742e5628e.metadata.json
Table UUID            a342220e-a732-47e6-9128-a5729f682247
Last Updated          1737955937100
Partition spec        [
                        1000: last_name_trunc: truncate[1](3)
                      ]
Sort order            []
Current schema        Schema, id=0
                      ├── 1: id: optional int
                      ├── 2: first_name: optional string
                      ├── 3: last_name: optional string
                      └── 4: email: optional string
Current snapshot      Operation.APPEND: id=80856117289882055, schema_id=0
Snapshots             Snapshots
                      └── Snapshot 80856117289882055, schema 0: s3://warehouse/accounts/users/metadata/snap-80856117289882055-1-0f5ec793-1625-4781-a3f9-697814a5ae4c.avro
Properties            owner                            root
                      write.parquet.compression-codec  zstd
You will notice a few important information in the output, including partition specification, current table schema, and the current snapshot pointer.
Wrapping up
In this tutorial, we've explored how to set up a local Iceberg lakehouse environment using Docker Compose, combining essential components like Spark, MinIO, PyIceberg, and the REST Catalog. This containerized approach offers several advantages:
Quick setup and experimentation with lakehouse architecture
Reproducible development environment across different machines
Time-saving infrastructure configuration
Risk-free testing before committing to cloud resources
While this setup is perfect for local development and learning purposes, it's important to note that production deployments require more robust solutions. For production environments, we recommend using established cloud-based lakehouse platforms that provide built-in scalability, security, and maintenance features.
The concepts and operations we've covered here—from table creation and data insertion to querying with PyIceberg—remain consistent whether you're working locally or in the cloud. This makes our Docker-based setup an excellent starting point for developing lakehouse solutions that can later be migrated to production environments.
If you are interested in posts like this, follow me on LinkedIn.