
Apache Iceberg Quickstart with PyIceberg
Simplest way to get hands-on with Iceberg without getting into the complexities of query engines and object stores.

In my previous post, I shared a study plan for starting your Apache Iceberg journey. Several readers have asked me to provide a super simple quickstart project to help them begin.
So, here we go.
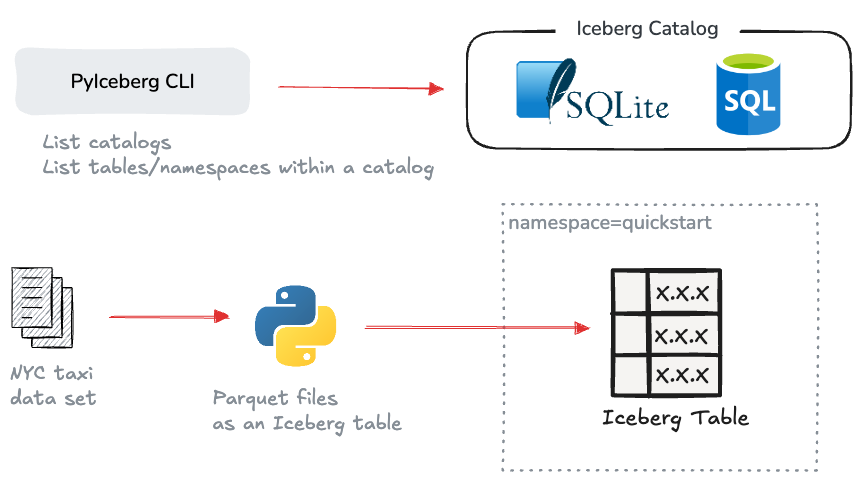
In this hands-on guide, we'll explore Apache Iceberg through PyIceberg, its official Python client. We'll cover three main tasks:
Setting up a local Iceberg catalog using SQLite
Creating and populating an Iceberg table with NYC taxi data with Python.
Working with the PyIceberg CLI.
The goal of this post is to help you begin your Iceberg hands-on journey without getting into the complexities of setting up object stores and query engines. We will do everything with Python while covering the essentials.
What is PyIceberg?
PyIceberg is the official Python client of the Apache Iceberg project. PyIceberg is by far the easiest way to get started with Iceberg, letting you run DML operations and queries on Iceberg tables, without depending on a query engine.
While query engines like Spark provide Python bindings, PyIceberg offers a pure Pythonic experience and a lightweight way to query Iceberg tables. This makes it perfect for data analysis with your favorite Python tools like Polars, Pandas, and DuckDB.
The easiest way to get started using PyIceberg is to install it via pip:
pip install -U "pyiceberg[pyarrow]"
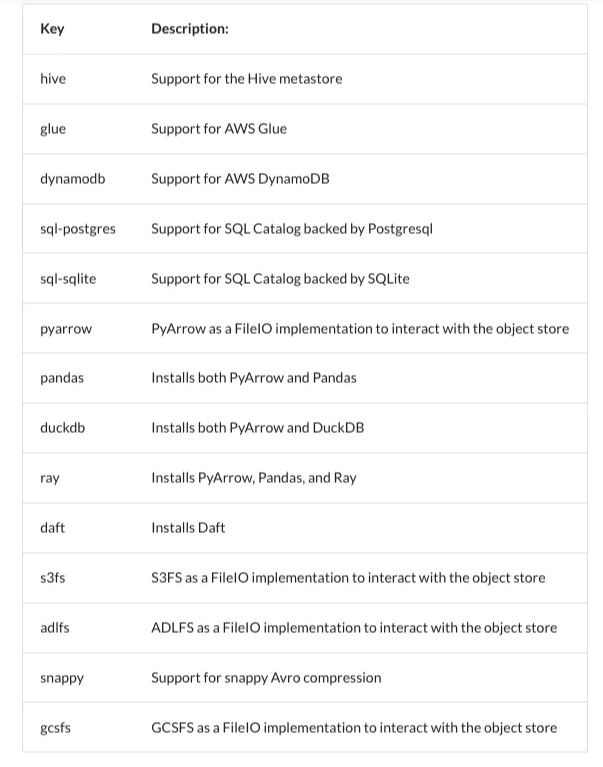
PyIceberg is a modular ecosystem with many extension packages. Depending on your need, you can install optional packages depending on your needs to keep the installation lightweight. We just installed pyarrow alongside PyIceberg, which enables working with PyArrow filesystem backend,(supports S3, HDFS, and others).
You can also install the following extras based on your catalog implementation. The REST catalog implementation is built-in. You either need to install s3fs, adlfs, gcsfs, or pyarrow to be able to fetch files from an object store.
Working with PyIceberg CLI
The PyIceberg installation includes the PyIceberg CLI, which lets you easily inspect table metadata through Apache Iceberg catalogs.
On a terminal, type the following to list the available commands.
pyiceberg --help

Usage: pyiceberg [OPTIONS] COMMAND [ARGS]...

Options:
  --catalog TEXT
  --verbose BOOLEAN
  --output [text|json]
  --ugi TEXT
  --uri TEXT
  --credential TEXT
  --help                Show this message and exit.

Commands:
  create      Operation to create a namespace.
  describe    Describe a namespace or a table.
  drop        Operations to drop a namespace or table.
  files       List all the files of the table.
  list        List tables or namespaces.
  list-refs   List all the refs in the provided table.
  location    Return the location of the table.
  properties  Properties on tables/namespaces.
  rename      Rename a table.
  schema      Get the schema of the table.
  spec        Return the partition spec of the table.
  uuid        Return the UUID of the table.
  version     Print pyiceberg version.
Working with a catalog
Iceberg uses a catalog as a central hub for organizing tables. This can be a traditional Hive catalog for storing Iceberg tables alongside others, a vendor solution like AWS Glue catalog, or an implementation of Iceberg's REST protocol. PyIceberg CLI is a great tool for exploring the namespaces and tables in an Iceberg catalog. It allows you to easily find what namespaces and tables exist and then dive deeper into the details.
The pyiceberg list lists all the registered catalogs in the system. If you run it at this point, you should probably see something like this:
pyiceberg list

URI missing, please provide using --uri, the config or environment variable PYICEBERG_CATALOG__DEFAULT__URI
That’s because we haven’t configured any catalog yet. Let’s configure our first catalog next.
There are three ways to configure PyIceberg:
Using the
~/.pyiceberg.yamlconfiguration fileThrough environment variables
By passing in credentials through the CLI or the Python API
Let’s follow the standard approach by creating a .pyiceberg.yaml file in your home directory, enabling a standardized configuration for multiple catalogs without defining them in code. You can change the directory location by setting the PYICEBERG_HOME environment variable.
To keep things simple, let’s create a local SQL catalog that will store information in a local sqlite database. We'll also configure the catalog to store data files in the local filesystem instead of an object store. This should not be used in production due to the limited scalability.
Let’s create a temporary location for Iceberg to store our data:
mkdir /tmp/warehouse
The SQL catalog requires a database for its backend. While we are using SQLite here, PyIceberg also supports PostgreSQL through psycopg2.
To finish defining the catalog, create the ./pyiceberg.yaml file in your home directory with the following YAML configuration. The uri parameter configures the connection URL and warehouse defines where Iceberg is supposed to store the data and metadata.
catalog:
  sandbox:
    type: sql
    uri: sqlite:////tmp/warehouse/pyiceberg_catalog.db
    warehouse: file:///tmp/warehouse
Use the Pyiceberg CLI to verify the catalog sandbox you just created above. It should list the namespaces in the catalog.
pyiceberg --catalog sandbox list
You will see an empty response as we haven’t created any namespace yet. Namespace is a logical grouping that you can use to organize related tables together.
Create the namespace quickstart :
pyiceberg --catalog sandbox create namespace quickstart

Created namespace: quickstart
Refer to this for more information about configuring other catalogs.
Create a table
Now that we configured our catalog, let’s create an Iceberg table and populate it with some data.
Let’s download one month of data from the famous NYC taxi dataset first.
curl <https://d37ci6vzurychx.cloudfront.net/trip-data/yellow_tripdata_2023-01.parquet> -o /tmp/yellow_tripdata_2023-01.parquet
We will some Python code to create the table and load the taxi data file into it. You could write a script or use Python3 REPL.
The primary starting point for working with the PyIceberg API is the load_catalog method that connects to an Iceberg catalog. To create a catalog instance, pass the catalog’s name from your YAML configuration:
from pyiceberg.catalog import load_catalog

catalog = load_catalog('sandbox')
Load the downloaded parquet file into your PyArrow dataframe:
import pyarrow.parquet as pq

df = pq.read_table("/tmp/yellow_tripdata_2023-01.parquet")
Create a new Iceberg table in the quickstart namespace that uses the dataframe schema. Then append the dataframe to the table:
table = catalog.create_table(
    "quickstart.taxi_dataset",
    schema=df.schema,
)
table.append(df)
To check how many records were written to the table, scan it as an Arrow dataframe and get its length.
len(table.scan().to_arrow())
This should result in 3066766.
The complete Python code we've written so far would look like this:
from pyiceberg.catalog import load_catalog
import pyarrow.parquet as pq

df = pq.read_table("/tmp/yellow_tripdata_2023-01.parquet")

catalog = load_catalog('sandbox')

table = catalog.create_table(
    "quickstart.taxi_dataset",
    schema=df.schema,
)

table.append(df)

print(len(table.scan().to_arrow()))
If you use the list command in the CLI, our new table will appear in the quickstart namespace.
pyiceberg --catalog sandbox list quickstart

quickstart.taxi_dataset
Explore Iceberg data and metadata files
Since the catalog was configured to use the local filesystem, we can explore how Iceberg saved data and metadata files from the above operations.
find /tmp/warehouse/Wrap up
In this post, we explored how to get started with Apache Iceberg using PyIceberg, the official Python client. We set up a local catalog, created our first Iceberg table, and loaded some real-world NYC taxi data into it. This shows us how straightforward it is to begin working with Iceberg tables in a pure Pythonic environment.
While this example used a local setup for simplicity, the same principles apply when working with production-grade catalogs and object stores. PyIceberg's flexibility allows you to easily switch between different catalog implementations and storage backends.
In the next post, I'll show you how to read an Iceberg table as a DuckDB table, which will open up more interesting querying possibilities and demonstrate Iceberg's interoperability with other data tools.
Error: "SQLAlchemy support is not installed"
I encountered an error indicating that "SQLAlchemy support is not installed" when trying to execute the command: pyiceberg --catalog sandbox list.
Cause:
This issue occurs because SQLAlchemy, which is essential for PyIceberg to interact with SQL databases (such as SQLite or PostgreSQL), is not included by default in the PyIceberg installation.
Solution:
To resolve this, I needed to install the necessary dependencies by running the following command based on the catalog type:
For SQLite:
pip install 'pyiceberg[sql-sqlite]'
This installs the required SQLAlchemy package, enabling PyIceberg to work with SQL-based catalogs.